Homemade Muesli

muesliNeed a little pick me up in the middle of the day, something nutritious to kick off the day, or healthy dessert. Spring is upon us and we can start to move on from all that heavy winter food and start eating lighter again! Fresh berries, nuts, and seeds help with digestion, keep your snack attacks healthier and more under control, keep you feeling fuller longer, and won’t leave you feeling guilty for having dessert tonight!


Simple, healthy, and delicious, this recipe is a must! Make a large                                   batch store it in a mason jar and keep it in the cabinet to use                                           throughout the week. Serve it with your favorite nut milk or                                               yogurt, or add fresh fruit to change it up every day!

Make your own  almond milk using our recipe-you won’t regret it!!!

 Ingredients:

  • 2 cups rolled oats
  • 1 cup almonds
  • ¼ cup pumpkin seeds
  • ¼ cup sesame seeds
  • 1 tablespoon flax seeds
  • ¼ cup unsweetened coconut
  • 1 cup fire raisins
  • ½ cup Goji berries
  • ½ cup dried cranberries, cherries, or apricots
  • ¼ cup cacao nibs
  • 2 tablespoons cinnamon
  • 2 tablespoons nutmeg

In an air tight container, Mason jar, zip lock bag, or plastic container. Mix all ingredients and store in a cool, dark place.


Fun Goodies for Kids in honor of National Nutrition Month

DSC_5858March is National Nutrition Month and obesity has become an epidemic with adults and especially our children. If we don’t start teaching our kids how to eat well and start focusing on exercise and nutrition at an early age, we’re taking away their opportunity for a long, healthy, and successful life. Who wants a life rigored by trips to the doctors, illness, and disease? As parents and caring adults it’s our responsibility to be our own advocate and more importantly for our children, grandchildren, Godchildren, nieces and nephews, etc.

Spring is right around the corner and that opens more opportunities to eat better with vegetables and fruits coming into season. Sometimes healthy food can be kind of boring and bland especially to children who have been used to a lot of salt (chips, pretzels, processed foods) and sugar (cookies, candy, ice cream, processed foods). Find ways to up your flavor profiles, make eating healthy an adventure or field trip, start a small garden, and have them learn to grow and take care of it.

I teach elementary kids how to start seeds, care for the seedlings, transplant them to our edible school yard, weed and care for their growing plants, harvest, and then we learn how to make something nutritious with their harvest. To watch them get so excited to get their hands dirty and run out and pick a tomato or pea pod to eat right off the vine is an incredible thing to see!

Need some help? Here are a few ideas to celebrate National Nutrition Month!

Start a snack garden- It doesn’t have to be a farmette or gigantic overwhelming garden. You can actually grow most veggies in  pots. Sit down with your little ones and see what they would like to try to eat and grow. The easy ones are tomatoes, peas, peppers, cucumbers, and herbs. You can actually start your pot with a tomato plant and grow the basil around the base of the tomato plant if you really want to save space! Use a large pot, add some soil, drop in a couple of seeds or to make it even easier buy an established plant at a hardware store. Place in full sun, make sure to give it a little water when the soil gets dry and watch it grow together. Once you plant starts to fruit. At snack time send the kids out picking. Come in and dip into some humus, sunflower butter, Greek yogurt mixed with herbs and a little lemon juice.

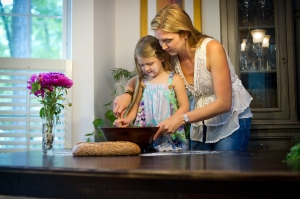
Get them in the kitchen with Kids Stir– I just found these guys and it’s so cool! I love it! It’s a monthly box that shows up in your mailbox each month. You can set your membership to your liking, but each month’s box is completely different. They contain different cooking exercises and everything you need for the activity in the box. So I’ve seen one called build a fish bowl. It has the directions, a poster of a fish bowl, and you get a cookie cutter shaped as a fish and the recipe to make the cookies, crackers, etc. You can always change recipes to be healthier too. It gets kids in the kitchen cooking and getting hands on with their foods. They love it! I can’t get my kids out of the kitchen, so much I can never get dinner cooked because they want to help so much! Check out their site, super cute! Or if you’re super creative make up your own ideas!

Skip the Fast Food Joints & Make your own at Home- The fast food joints are the worst, between the high caloric food, low-grade meats, all the hands touching and retouching your food, not to mention how awful and sluggish you feel after eating it! Have “fast food” at home! Dinner doesn’t have to take 2+ hours to make every night most meals can take 20 minutes from prep to table. Some times you just have to multitask! Have kid-friendly and fast food nights with a healthy twist. Make your own taco bar, put each ingredient in separate bowls and let everyone build their own tacos. You can get frozen pizza dough balls, let them thaw, knead them out a bit and let everyone make their own separate pizzas! Choose a good mozzarella cheese, make your own sauce with just tomato paste, olive oil, herbs, salt and pepper, and then load up the veggies for everyone to pile high on their pizza. Make breakfast for dinner one night a week. I actually just started doing this and kids think it so fun and they get super excited. Waffles, omelets, pancakes, etc are all fast and healthier options then running to the closest burger joint,plus the kids can get involved and help in the kitchen with these too!


Here’s to a celebrating National Nutrition Month and to a healthier kids!


Make Your Own Kombucha!

kombucha1Kombucha! Who wants to learn how to make their own? Kombucha is fermented sweetened tea, it’s slightly tangy and a little sweet. It can be double fermented to make it into a fizzy soda by just adding fruit or fruit juice. Only thing is you have to be patient making it. It can take up to a week or even two sometimes, but it’s totally worth the wait! Especially when you’re looking for some thing different to drink or on a super hot summer day.

In health food stores and grocery stores they can cost anywhere between $3-$5. Kinda high price for a drink with no rum or vodka to go with it right? 😉 It’s high in anti-oxidants, probiotics, and B-vitamins too! Kombucha is brewed with a SCOBY (Symbiotic Colony of Yeast and Bacteria) that “eats” the sugars in the sweetened tea and creates an acidic, vitamin and probiotic rich beverage. So… you ready to learn how to make it??

First you’re going to need a SCOBY and you can’t get them just from the grocery store. Know anyone making their own kombucha? After every batch or two,a SCOBY will have a baby and they can be used to make kombucha or other fermented goodies. So ask a friend if you take one of theirs. Don’t know anyone making their own Kombucha yet, you can always order one online. (You can find some on Amazon.) Remember when you’re about to start making your kombucha, be sure that your hands are really clean and all containers have been cleaned very well also.

Ingredients:

  • 1 gallon size glass or pottery jar
  • 1 gallon of brewed sweetened tea (ratio: 1 cup of sugar per gallon of tea)
  • a SCOBY and ½ cup of liquid from a previous batch of Kombucha
  • coffee filter, cheese cloth, or thin cloth (Walmart sells this for really cheap) and a rubber band

Directions:

  1. Prepare the sweet tea. Add 8-10 tea bags per gallon of water. Add 1 cup of regular sugar (organic is best).
  2. Let tea cool to room temperature and make sure it is really cool! If you don’t let it cool completely it will kill your SCOBY.
  3. Once tea is cool, pour into glass jar, Pour in ½ cup liquid from a previous batch of Kombucha or if starting from a dehydrated SCOBY, pour in ½ cup from a store-bought bottle of Kombucha.
  4. Make sure again your hands are clean. Place the SCOBY at the top of the jar of tea. It should float.
  5. Cover the jar with the coffee filter or cloth and rubber band tightly.
  6. Put jar in a warm corner of the kitchen. Make sure it’s not close to any other fermenting projects!
  7. Let it rest for about 7 days, After the 7 days you can taste it, make sure to try the tea under the SCOBY. It should be sweet and tarty.
  8. Remove the SCOBY and make sure to save at least 1/2 cup of this batch to start your next batch!
  9. It’s ready to drink! Pour into separate jars with a tight seal until ready to drink.

Want to do the second ferment and make it more like a soda? You can add juice or fresh fruit. Just keep an eye on the fruit it will ferment and break down quickly making it kinda slimy. Yuck!

You start with the same set up, just add your frozen or fresh fruit, or even fruit juice. I let my last batch of blackberries and raspberries sit in for about 2 days. Fruit juice can ferment longer. The more juice you add the sweeter it will be so just watch how much you use. Remember fresh fruit is going to break down quick. Kinda like making sangria, fruit will start to get mushy and slimy. Remove the fruit and SCOBY and pour into separate jars. Serve and Enjoy!!!


Make Your Own Home Cleansers & Shaving Cream with Essential Oils

We all know sprays, cleansers, scrubs, and detergents are expensive and loaded with toxic chemicals. What if I told you by using essential oils you could make your own  cleansers, save money, get rid of a lot chemicals and toxins in your home. And if you’re a mama (or dad) like me, you worry about what your children or pets come in contact with when they touch counter tops, sinks, bathtubs, even the kitchen floor with whatever you just sprayed to clean.

In a matter of minutes you can make your own disinfectant, laundry detergent, even your own shaving cream! (Ever read the label on your shaving cream? It usually says it’s flammable! I don’t know about you, but would you shave your legs with gasoline? Kind of the same thing right?) Well here are a couple secrets to make a few things around you house to rid yourself and family of life-threatening chemicals. I use  oils because they are Certified Therapeutic Grade, which means they are the most potent oils you can get. Feel free to change up the scents on some of the things you make if you’re not too crazy about a certain smell.

Some of these I have made before and love them. A few I’ve gotten from doTerra. Here’s to clean, safe, and healthy homes and bodies! Looking for essential oils?

Laundry detergent:

  • Borax
  • Arm and Hammer Super Washing Soda (not baking soda)
  • Ivory Soap or Fels Naptha
  • Fine grater
  • Lavendar essential oils
  • Glass container or metal bucket

Instructions:

Grate soap bar. You need 1 to 1 ratio- 1 cup Borax to 1 cup of Arm and Hammer washing soda. Stir well. 3-5 minutes. Add 15 drops of Lavendar or your favorite scented oil. Stir well again. This makes 32 oz which equals 64 loads of laundry. Use 1-2 scoops per load. Double or Triple the recipe to save yourself time. I load of laundry using this recipe will only cost you 3 cents per load!!! Huge Savings!!!

Counter and Kitchen Cleaner:

  • Spray Bottle
  • 2-3 drops Lemon essential oil
  • 2-3 drops Purify cleansing blend essential oil
  • 1 tablespoon vinegar
  • water

Instructions:

In a spray bottle, add all ingredients and spray away!! 🙂

Shaving Cream:

Ingredients:

  • 1 cup virgin coconut oil
  • 1 tablespoon olive oil
  • 10 drops of your favorite essential oil
  • Glass container

Instructions:

Blend all ingredients together in a blender or stir really well with fork. Place mixture in glass container. Shake well before each use.

Make Your Own Almond Milk

One of your 2014 resolutions to cut back on dairy or maybe to eliminate it completely? Maybe you’ve decided to replace your whole or skim milk with coconut, oat, soy or almond milk. A lot of the nut milks on the shelves contain chemicals and preservatives to help keep them stay shelf stable and on the shelves longer.

What if I told you, you could make your own fresh, homemade almond milk with just a little prep time and extra 10 minutes to make it. It lasts for 4-5 days in the refrigerator if you don’t drink it all first! Use it for cereal, smoothies, milk shakes, anything your heart desires. Reap in all the nutrients, fiber, and heart healthy oils! It will be hard to go back to almond milk from a box, I promise.

Ingredients:

  • 3 cups almonds
  • 6 cups water
  • 1-2 tablespoons agave or honey (optional)

In a large bowl soak almonds in water for 4-6 hours.  Rinse and change water once or twice. Make sure to rinse well after the almonds have softened. Add softened almonds and 6 cups of water to an immersion or high speed blender and blend until it becomes a milk. Add agave or honey if you wish to sweeten the milk and blend again.

In a container- preferable a glass milk container or something that will easily pour later. Place a funnel over the container. Using a piece of cheese cloth or nut bag, pour milk mixture in to the bag a little at a time. Squeeze the bag to allow the milk to go thru the nut bag or cheese cloth. (Think of milking a cow) Once you’ve squeezed all the milk thru the bag. Almond milk will be in the container. Store in the refrigerator for up to 5 days. The remaining almond pulp inside the bag, can be saved in an airtight container and stored in the freezer for up to 4 months. The almond pulp can be used to make flour later or for other types of baking.

Sundried Tomatoes-Make Your Own!

Still looking for other ways to use your abundance of tomatoes from your garden? Here is a simple and universal way to use up all those garden-fresh lovelies! Make sun-dried tomatoes!

They’re so fast and easy to make and once your done there is so many ways to use them. You can add them to pasta, salads, make pesto, even include them to risotto dishes. Add them to sauces, to top off chicken or pork, even incorporate them into dessert. They store for up to 6 months, or  freeze them and they could last well over a year.

I made mine using my dehydrator, you can also use an oven. If you do use your oven, bake them at 150 degrees for 10+ hours or if you want to speed up the process, increase the heat to 200 degrees but make sure to watch them because they tend to burn,

To make them with your dehydrator… Pick a tomato you really like or have an abundance of. I like to use Romas because they tend to hold up longer. Core them and then cut them in halves or in quarters. Place them on the dehydrator racks, make sure to separate them so the air can circulate around them to help drying more quickly. Add salt, pepper, garlic or even fresh herbs to make them unique. Put the dehydrator on 140 degrees and wait for 6-12 hours. Just remember to keep  checking on them.

Once they’re done, store them in Ziploc or vacuum seal them. Then, give them away or keep them for yourself! Enjoy!

Going Organic! Basil Pesto Recipe & A Week Full of Menu Ideas!

Going along with Isla Magazine and my “How to Go Organic Without Overwhelming Yourself” article for last week. I’ve included a weeks worth of organic menu ideas, a green juice recipe along with a video on how to make your own garden fresh basil and pine nut pesto.

I hope this makes going organic a little easier for a lot of you out there. I know it can be super overwhelming with all the conflicting information out there. But these organic menu ideas should take some of the work and stress out of preparing meals this week. Let me know how your week goes, what recipes you liked the best, any new recipes you invented, and if you have any questions!

***And I forgot to note in the video that pesto can be stored in the freezer for up to a year, just use a teaspoon as you need it and add a little more olive oil to help the paste become more creamy again.***

Continue reading

Homemade Miso Soup

So, I actually got a trip in to the gym this morning, it felt great to run, do a little free weights, and about 20 minutes of Pilates and I was ready to tackle the day’s long list. As I was walking out the door, I saw these huge, beautiful, fluffy snowfalkes filling the sky. I think I actually said out loud, “It’s snowing?” I think it’s only flurried here one other day this entire winter, let alone been cold enough for snow. But it actually made me smile to see all this flakes peacefully falling to the ground. Couldn’t ask for a more perfect soup day! I drove home thinking about what kind of soup to make that would be quick enough to enjoy watching the snow fall and also quick enough that I still wouldn’t still be starving 2 hours from now… Miso soup! It’s quick, easy, and perfect for a snowy day. Here’s what you’ll need…

Ingredients:

  • 2 stalks of organic celery-diced
  • 2 stalks of organic carrots-peeled and diced
  • 1 can of cooked organic chickpeas or dried ones-they need to soak for 8+ hours so plan ahead next time you want to make this soup. Dried chickpeas can be found in bulk or packaged already at Whole Foods, Harris Teeter or any Health Food stores.
  • 1/2 white or yellow onion-chopped
  • 1 large package of Shitake mushrooms
  • 4 cups of water
  • extra virgin olive oil
  • 1 cup of organic broccoli-fresh is better but frozen is fine too. (**** I picked a ton of broccoli last fall at a farm, blanched it, then froze it. I’ve had a little stash for all my winter recipes! Great way to eat better and save money too!)
  • 2 Tbsp of white miso-can also be found at stores above.
  • Coarse sea salt

Directions:

  1. Heat olive oil over medium heat in a pot.
  2. Add onion, celery, carrots until tender- about 8 minutes
  3. Add mushrooms, broccoli, and chickpeas and cook for about 4 minutes
  4. Add water and bring to a boil, then let simmer until all vegetables are tender, about 10-15 minutes. Remove from heat.
  5. In a seperate small bowl-dissolve white miso with 2 Tbsp of cold water, add to soup and mix. Finally add salt to taste.

That’s it! It’s that simple! I love this recipe! It’s sooo good and it cuts out most of the salt normally found in Asian soups. I’ve tweaked this recipe to make it mine. Sometimes, I add dried seaweed, or garlic, and even tofu. But if you’d like the orginal recipe, it can found in “Whole Living Magazine.” It’s in the January and February issue. Hope you enjoy it!